

How To Seal Shrinky Dink Drawings

Go ahead and read beneath to hear about the experiments (and the comments, some not bad info there too!), only here is a summary of some of the lessons learned with the diverse techniques. What you lot choose depends on your desired results, and too what y'all accept decorated your shrinkies with:
- Spray Acrylic – Equally nosotros learned in our previous experiments, this can cause permanant markers to lighten and/or run together. So utilize cautiously, or include these 'bugs' as features in your design!
- Embossing powder – although several people swear by this, our tester did not have much success. If yous use it anyway for other crafts, and have information technology on hand, give it a endeavour.
- Polyurethane – my trials with this are documented beneath. It is a good option for some projects, but exist conscious of the possibility of nifty issues for small items like jewelry that have holes in them.
- Diamond Coat (or Triple Thick Coat or Crystal Effects) – Diamond Coat has consistently expert results from testers, and is recommended. Cons are that information technology may be hard to find, merely I've included Amazon Links at the bottom of this postal service (support Dabbled!).
- Modernistic Podge: Recommended by a couple of readers, just this was not tested as part of the lab.
- Blast Polish: Apparently works really well, but note that it can xanthous over time.
- Spray Poly: Able to utilize a thinner coat than by dipping or brushing, so this might work really well without having some of the downsides of the paint on kind.
Practice yous accept a sealing story to share? Exit it in the comments!
See all 5 installments in this 4 role series! If you're starting with this 1, get read the first several to get to this indicate.
Also: an Instructable on the original putter earrings, including some of the lessons learned.
And then, I thought I had it all figured out. Afterward some web enquiry, and checking what supplies were in my basement, I figured I'd seal the shrinkies with a jar of Polyurethane.. There are other methods (embossing powder, nail polish, and other stuff–ValGalArt mentioned in the comments that Shrinky Dinks makes something to seal them with) but this seemed like a expert bet.

I took 2 charms (colored front & back), and dipped one (the cherry-red one) and painted the coating on the other (green). I then hung the dark-green one to dry thoroughly (the poly needs to cure overnight. This actually worked well, no smearing, colors stayed truthful. All the same when I started to have pictures, I noticed that both of them had a tiny hairline cleft in the plastic itself, by the hole. I'k not certain if the poly stressed the plastic or what. It seems to be structurally audio (i don't recall information technology's going to break at the scissure or anything), only still not perfect. So read on..
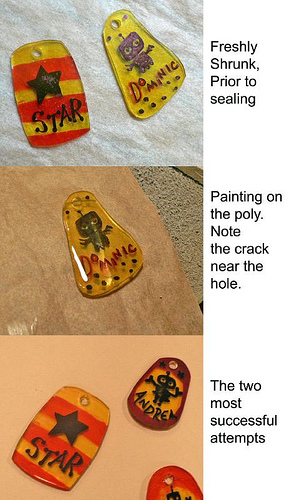
I figured that the culprit was either hanging them to dry out (stressing the plastic more than around the hole) or that the top was but too narrow. So I did a few more than experiments. "Star" was done equally a rounded rectangle, and dipped and hung. No cracking. "Andrea" was done by painting on the poly and letting it dry flat. No slap-up. Even so the yellow "Dominic" was washed the same way, and it cracked later on I coated ane side. Then my guess is information technology's somewhat hitting or miss. The narrow tops of "Andrea" and "Dominic" are just more prone to cracking. But perhaps I didn't stress the plastic too much when i hole punched "Andrea". From this I'd guess that the wider rectangle is just less prone to cracking. But it doesn't seem to matter if you hang them or lay them flat.
So, I appeal to you, my readers, to let me know your results if yous try this method, and if you try annihilation else. Take earlier and afterwards pics and send them to me and I'll postal service them hither @ dabbled as a follow-up. I particularly want to see how embossing powder works (it was recommended several places), just I don't have an embossing gun and then I'll demand a volunteer to do that option.
8/8/08 Edit:
Heather Sitarzewski did some sealing enquiry for us! The results:
Better late than never… I tried coating the shrinkies with embossing powder and I concluded up with a bubbly, melted mess. And so I decided to try a articulate embellishing accent called "Crystal Effects" from Stampin' Upwards (you can besides go something called Glossy Accents from Archiver's, Hobby Lobby etc.) it worked brilliantly!!! Although I lost the one I did that to… so I'll accept to make more! Will attempt to post as before long as I have the next batch completed!
Edit: From the commenters:
meggiecat said…
I love shrinky. JudiKins Diamond Glaze in the squeeze bottle works beautifully as a sealer and a glue for multipiece objects.
Lucky Squirrel has a chart near sealers for their PolyShrink product.http://www.luckysquirrel.com/info_sealers.html
Aimee said…
..I've used embossing powder on shrinkies before, and it works really well, I call up it would be hard to glaze both sides though.
I promise you've enjoyed this Shrinkies Experiment series! I've had a lot of fun trying all this stuff and hopefully you're now inspired to create some fun stuff from things you would normally throw away.
Oh yeah, and retrieve, i need validation that I didn't write all this up for it never to be seen by homo eyes… so don't forget that posting a comment on one of the posts in this serial enters you in the drawing to win some of the output of the experiments!
See all 5 installments in this 4 role series!
Not on Amazon: Crystal Furnishings from Stampin' Up


Source: https://dabbled.org/part-4-of-shrinky-dink-test-lab/
Posted by: colemanguideare.blogspot.com
0 Response to "How To Seal Shrinky Dink Drawings"
Post a Comment