1. Setting up Rubrics
    1. Creating a Rubric
    2. Attaching an existing Rubric in a new Assignment
    3. Creating a Rubric in a New Assignment
    4. Creating a Rubric in an Existing Assignment
    5. Previewing a Rubric
    6. Rubric Settings Explained
    7. Options Settings Explained
    8. Editing a Rubric
    9. Deleting a Rubric
    10. Related Support Links

Rubrics are evaluation grids with rows of grading criteria arranged into achievement levels. In Brightspace, assessments and rubrics can be built separately in the Course Admin panel and then attached to activities, or a rubric can be created within the assessment directly.

Rubrics are excellent tools to help ensure that grading is consistent and clear across multiple graders in a course. Rubrics also help students understand the grading criteria and achievement expectations.

There are two types of rubrics:

  • Analytic rubrics use multiple criteria and allow for feedback at each criterion level. Analytic rubrics make the most sense when different assessment categories are important. Analytic rubrics can be scored using text, points, and custom points. When you create a rubric, the default is that it will be an Analytic rubric. Review the video tutorial of how to create an analytic rubric.
  • Holistic rubrics use a single criterion with defined levels of achievement. Holistic rubrics are best used to evaluate overall performance. Holistic rubrics use percentages and text scores. Review the video tutorial of how to create a holistic rubric.

Rubrics can be created when you are initially creating and assignment or they can be added after the assignment has been created. To view sample rubrics, see the Eportfolio Grading Rubrics page.

Rubrics can be used in multiple places within Brightspace:

Tool Can a rubric be attached? Does feedback transfer to the Grade Book?
Assignments Yes Yes
Quizzes No N/A
Surveys No N/A
Grades Yes Yes
Discussions Yes Yes
Self-Assessments No No

Setting up Rubrics

Creating a Rubric

  1. Log in to Brightspace using your MyCarletonOne  credentials.
  2. On your Brightspace homepage, locate your course in one of the following ways:
    • Click on your course under My Courses.
    • Click the Course selector grid , then select your course from the drop-down menu.
  3. Click on Course Admin in the course navbar.
  4. Under Assessment, click Rubrics
  5. Click New Rubric.
  6. Enter a rubric name
  7. Click Type: Analytic, then select a rubric type (Analytic or Holistic).
  8. Click Scoring: Points, then select a scoring type for the rubric
  9. Click the Criterion to customize the criterion name.
  10. Click to the right of Criterion 1 to enter a description for each of the rubric levels.
  11. Click Level (Level 4. Level 3, etc.) to customize the name of each achievement level.

    TIP:Click the + icon to add a new level or the trash icon to delete a level.

  12. Click the pt values below each level (1, 2, 3, 4) to customize the point value.
  13. Scroll down to the Overall Score table and adjust as needed, or leave the default as is, depending on your needs. For each level, enter how many points a student needs to achieve to accomplish that level.
  14. Click Options to expand the settings for rubric visibility and other customizable settings.
  15. Close the window when you are finished. The new rubric will now be available under Course Admin > Rubrics.

NOTE: The rubric saves automatically as you input information, so there is no Save button.

Attaching an existing Rubric in a new Assignment

  1. Log in to Brightspace using your MyCarletonOne  credentials.
  2. On your Brightspace homepage, locate your course in one of the following ways:
    • Click on your course under My Courses.
    • Click the Course selector grid , then search for your course name or select your course from the drop-down menu.
  3. Click Content  in the Navbar to go to the Content  view of the course.
  4. Click on  the module/week section where you'd  like to add the Assignment (See the example screenshot below).
  5. Click the Upload/Create button.
  6. In the drop-down menu, select New Assignment . You will be taken to the Assignment Editing screen.
  7. Enter a Name  for the assignment.
  8. Enter a number in Score Out Of  to add a grade and add an item to Grades (the gradebook ) .
  9. Click In  Grades  to and Choose from Grades  to add an item to the g radebook , to R emove from Grades , or to Reset  to  Ungraded .  If you have set up  categor ies  in the gradebook, you will be able to select it by clicking the No Category dropdown menu and clicking OK.
  10. Click Due Date  to add a due date for the assignment. This date will automatically be added to the course Calendar .
  11. Add instructions to make your expectations clear for your students.  Include details such as word/page count (if relevant), grade weight, content requirements, organization and structure of the submission etc.
  12. To add attachments, such as an Assignment sheet or relevant reading, click the icons indicated below based on your needs:
    1. to add File Uploads (attachments)
    2. to attach a link to an Existing Activity
    3. to attach a W eblink
  13. See links below f or information on adding Availability Dates & Conditions , information on Submission & Completion  or Evaluation & Feedback .
  14. Click Evaluation & Feedback
  15. Click Add Rubric
  16. Click Add Existing to select a pre-made rubric.
  17. Click the check box beside the rubric you wish to attach to the assignment.
  18. Click Add selected.
  19. Click Save and close at the very bottom of the page to finalize the assignment and rubric. The rubric will now be attached to the assignment.

Creating a Rubric in a New Assignment

Follow the steps for creating an assignment. Before clicking Save and Close follow these steps:
  1. Log in to Brightspace using your MyCarletonOne  credentials.
  2. On your Brightspace homepage, locate your course in one of the following ways:
    • Click on your course under My Courses.
    • Click the Course selector grid , then search for your course name or select your course from the drop-down menu.
  3. Click Content  in the Navbar to go to the Content  view of the course.
  4. Click on  the module/week section where you'd  like to add the Assignment (See the example screenshot below).
  5. Click the Upload/Create button.
  6. In the drop-down menu, select New Assignment . You will be taken to the Assignment Editing screen.
  7. Enter a Name  for the assignment.
  8. Enter a number in Score Out Of  to add a grade and add an item to Grades (the gradebook ) .
  9. Click In  Grades  to and Choose from Grades  to add an item to the g radebook , to R emove from Grades , or to Reset  to  Ungraded .  If you have set up  categor ies  in the gradebook, you will be able to select it by clicking the No Category dropdown menu and clicking OK.
  10. Click Due Date  to add a due date for the assignment. This date will automatically be added to the course Calendar .
  11. Add instructions to make your expectations clear for your students.  Include details such as word/page count (if relevant), grade weight, content requirements, organization and structure of the submission etc.
  12. To add attachments, such as an Assignment sheet or relevant reading, click the icons indicated below based on your needs:
    1. to add File Uploads (attachments)
    2. to attach a link to an Existing Activity
    3. to attach a W eblink
  13. See links below f or information on adding Availability Dates & Conditions , information on Submission & Completion  or Evaluation & Feedback .
  14. Click Evaluation & Feedback
  15. Click Add Rubric
  16. Click Create New from the pulldown menu. You will be taken to the Edit Rubric
  17. Enter a name for the rubric in the Name box.
  18. Ensure that the rubric's status is set to Published.

    NOTE:If a rubric is not published, it will not be available for use.

  19. Click on Criterion 1 to add copy or type text in the box
  20. Click on other Criterion boxes to add text.

    NOTE: Criteria can be added by clicking the Add Criterion button at the bottom of the rubric or deleted by clicking the trash can at the right of a row.

  21. Click the boxes under the levels to copy or type text descriptions.

    NOTE:levels can be added by clicking the plus signs at either side of the top row of the rubric or removed by clicking the trash can within each level.

  22. When you have finished customizing the rubric settings, click Save and Close at the bottom of the page. The assignment and rubric will be ready for use.

Creating a Rubric in an Existing Assignment

  1. Log in to Brightspace using your MyCarletonOne  credentials.
  2. On your Brightspace homepage, locate your course in one of the following ways:
    • Click on your course under My Courses.
    • Click the Course selector grid , then search for your course name or select your course from the drop-down menu.
  3. Click Tools in the Navbar
  4. Click Assignments in the drop-down menu
  5. Click the down arrow next to the assignment you wish to edit.
  6. Click Edit Assignment.

    NOTE:The course will need to have the New Assignment Creation Experience enabled to see the rubric options indicated below.

  7. Click Evaluation & Feedback
  8. Click Add Rubric
  9. Click Create New from the pulldown menu. You will be taken to the Edit Rubric
  10. Enter a name for the rubric in the Name box.
  11. Click on Criterion 1 to enter text in the box
  12. Click on other Criterion boxes to add text.

    NOTE: criteria can be added by clicking the Add Criterion button at the bottom of the rubric or deleted by clicking the trash can at the right of a row

  13. Click the boxes under the levels to copy or type text descriptions.

    NOTE:levels can be added by clicking the plus signs at either side of the top row of the rubric or removed by clicking the trash can within each level.

  14. When you have finished customizing the rubric settings, click Save and Close at the bottom of the page. The assignment and rubric will be ready for use.

Rubric Settings Explained

  • Status: The status of the rubric can be changed by clicking Status in the top right corner of the rubric. The options are Published, Archived, and Draft.
  • Analytic: There are two types of rubrics: Analytic and Holistic. The default is Analytic. If you want to change it, click Analytic above the rubric itself and select Holistic.
  • Scoring Points: The default is for rubrics to grade by points. This can be changed to No Score or Custom Points in the Scoring Points pulldown menu.
  • Reverse Level Order: The order of the score levels can be reversed by clicking Reverse Level Order. This means that the points can increase left to right or right to left (this is the default).
  • Add Criteria Group: Criteria can be grouped and labelled. To add additional Criteria Groups, click the Add Criteria Groups below the rubric. To label a Criteria Group click Criteria at the top left of the rubric and type the title. Repeat for additional criteria groups.
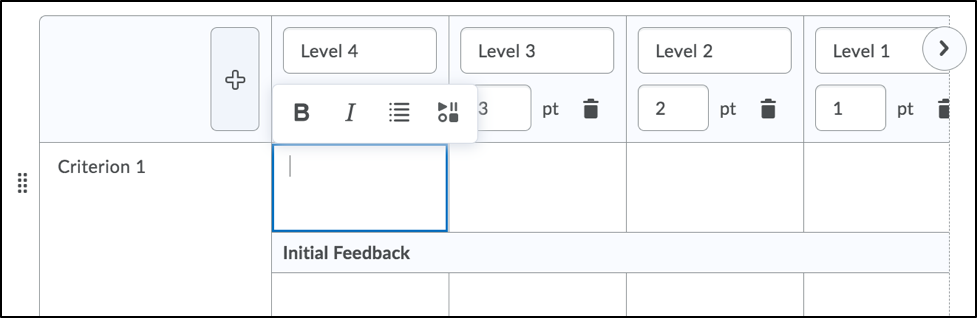
  • Overall Score: An overall score for the rubric is calculated in a separate section below the rubric. Additional feedback may be included for each level by clicking the boxes under the levels. Additional levels may be added by clicking the plus signs at either side of the top row of the rubric or levels may be removed by clicking the trash can within each level.

Options Settings Explained

At the bottom of the page is an Options link. Click it to find options for rubric and score visibility.

  • Rubric Visibility: There are three main options for visibility. The rubric can be visible to students, it can be hidden from students, or it can be hidden from students until the feedback is published. There is also an option for the rubric to be hidden but still included in overall feedback provided to students.
  • Score Visibility: Scores can be visible to students or they can be hidden.
  • Description: There is an option to add a rubric description that is only visible to you, the instructor.
  • Advanced Availability: This option allows you to associate the rubric to competencies if you have set them up in the course.

Editing a Rubric

  1. Log in to Brightspace using your MyCarletonOne  credentials.
  2. On your Brightspace homepage, locate your course in one of the following ways:
    • Click on your course under My Courses.
    • Click the Course selector grid , then select your course from the drop-down menu.
  3. Click on Course Admin in the course navbar.
  4. Under Assessment, click Rubrics.
  5. Click the arrow next to the rubric you wish to edit.
  6. Select Edit from the drop-down menu. You will be taken to the Edit Rubric page.
  7. Make your changes.
  8. Click Save.

Deleting a Rubric

  1. Log in to Brightspace using your MyCarletonOne  credentials.
  2. On your Brightspace homepage, locate your course in one of the following ways:
    • Click on your course under My Courses.
    • Click the Course selector grid , then select your course from the drop-down menu.
  3. Click on Course Admin in the course navbar.
  4. Under Assessment, click Rubrics.
  5. Click the arrow next to the rubric you wish to delete.
  6. Select Delete from the drop-down menu.
  7. You will be prompted to confirm that you want to delete the rubric. Click Delete.

Related Support Links

  • D2L Video Tutorial: Create an Analytic Rubric
  • D2L Video Tutorial: Create a Holistic Rubric
  • D2L Video Tutorial: Add a Rubric to an Existing Activity
  • Teaching and Learning Services: Steps to Creating a Grading Rubric

Was this page helpful?

132 6a9faaaf84

Thank you for your feedback.

1 Person found this useful

Posted in Course Activities and Assessments Share: Twitter, Facebook
Short URL: https://carleton.ca/brightspace/instructors/?p=132